Friday 25 February 2011

How to disassemble HP Pavilion tx2000 Tablet PC


In this guide I explain how to disassemble a HP Pavilion tx2000 Tablet PC and remove the motherboard. I’m removing the motherboard in order to repair failed NVIDIA chip.
Before you start, make sure the laptop is turned off and battery removed.
STEP 1.
Loosen five screws securing hard drive, memory and wireless card covers.
Remove all three covers.

STEP 2.
Lift up one side of the hard drive by the black tab to disconnect it from the motherboard.

STEP 3.
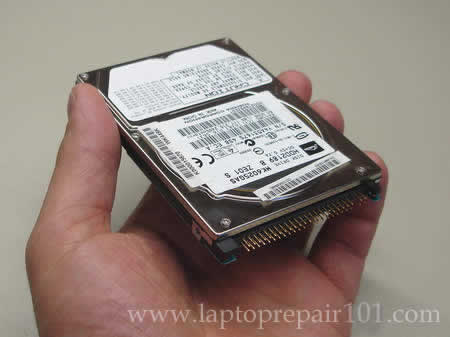
Remove the hard drive assembly.
By the way, it’s a regular 2.5″ notebook SATA hard drive. There is an adapter connected to the hard drive. That’s why the hard drive connector doesn’t look like a regular SATA connector.

STEP 4.
Both memory modules can be accessed though a door on the bottom of the laptop.
Remove both memory modules.

STEP 5.
Disconnect two antenna cables from the wireless card.
Remove two screws securing the wireless card.

STEP 6.
Pull the wireless card from the slot.

STEP 7.
Unlock the DVD drive and remove it from the laptop.

STEP 8.
Remove four screws securing laptop keyboard on the bottom.

STEP 9.
Carefully lift up the keyboard from the laptop case.

STEP 10.
Now you can access the keyboard cable connector which is located underneath the keyboard.

STEP 11.
Before you can remove the keyboard cable, you’ll have to unlock the connector.
On the following picture the connector shown in the locked position.
In order to unlock the connector, lift up the right side of the brown clip at a 90 degree angle.

STEP 12.
On the following picture the connector is shown in the unlocked position.
Now you can pull the keyboard cable from the connector.

STEP 13.
Remove the keyboard.
New replacement keyboard for HP Pavilion tx2000 laptops available here.

STEP 14.
Remove four (red) screws securing the hinge cover.
Remove three (yellow) screws securing the display hinge and cable cover.

STEP 15.
Under the cover you’ll find two display cables.
Disconnect both cables from the motherboard.

STEP 16.
Turn the laptop display and start removing the hinge cover.

STEP 17.
The hinge cover removed.

STEP 18.
Disconnect LCD cable from the motherboard.

STEP 19.
Remove two screws securing the display hinge.

STEP 20.
Lift up and remove the display assembly.

STEP 22.
Remove screws from the bottom of the laptop.

STEP 23.
Remove two screws securing the top cover.
Disconnect two cables from the motherboard.

STEP 24.
Remove the top cover assembly.

STEP 25.
Disconnect two cables from the motherboard.

STEP 26.
Make sure the Express Card slot cover removed.

STEP 27.
Carefully lift up the left side of the motherboard.

STEP 28.
Remove motherboard from the laptop base.

STEP 29.
The motherboard has been removed.
On this side of the motherboard you can access the CMOS battery.

STEP 30.
On the other side of the motherboard you can access and remove the cooling module (heatsink with fan).

STEP 31.
Remove four screws securing the heatsink assembly.
Disconnect fan cable from the motherboard.

STEP 32.
Carefully lift up and remove the cooling module.
New fans for HP Pavilion tx2000 laptops available here.

If the heatsink is clogged with dust, you can blow it off using compressed air.

STEP 33.
After the cooling module is removed, you can access and remove the CPU (processor).


                                                                                     by insidemylaptop

How to fix laptop motherboard with failed NVIDIA graphics chip


In this post I explain how you can fix a laptop motherboard with failed NVIDIA graphics chip. This repair might apply to some HP/Compaq laptops and probably some other laptop brands. If this repair works for your laptop, please mention the brand and model number in comments after the post. This will help other readers with similar laptops.
By the way, I just fixed my son’s Xbox 360 with red ring of death (error 74) using exactly same technique.
MOST COMMON PROBLEM SYMPTOMS
1. Laptop turns on with garbled video on the internal laptop screen and external monitor.
2. Laptop turns on as normal but there is no video on the internal laptop screen or external monitor.
MY UNDERSTANDING OF THE PROBLEM
The NVIDIA graphics chip soldered to the motherboard. When the laptop gets very hot, the NVIDIA chip separates from the motherboard and laptop video fails.
HOW TO FIX FAILED NVIDIA CHIP
I have previous posts explaining how I fixed same problem by baking the motherboard in an oven or bubble-wrapping the laptop. But today I’m going to fix the motherboard using a heat gun. Basically, I’m going to heat up the NVIDIA chip with a heat gun to solder it back to the motherboard (reflow). I think this method is more reliable and the repair should last for a while.

WARNING!
There is no guaranty this method works all the time. While doing this repair you may damage the motherboard and make it unrepairable. Also, you may damage the laptop while taking it apart.
Proceed at your own risk and don’t blame me if you turned your laptop into a very expensive door stop. :)
If you don’t feel comfortable doing this repair, take your laptop to the repair shop.
HOW I FIXED THE MOTHERBOARD
First of all, you’ll have to disassemble the laptop and remove the motherboard. You can find laptop disassembly procedure in the service manual. If you having trouble finding the manual, leave a comment and maybe I can point you to the right direction.
In my example I’m using a motherboard removed from HP Pavilion tx2000 laptop.
In most laptops the graphics chip located under the CPU heatsink (and it has NVIDIA logo on it), so there shouldn’t be a problem locating the chip. The chip has a glossy top surface.

For this repair I’m going to use an Ecoheat heat gun EC-100.

In order to figure out how to position the heat gun and for how long, I tested it on a penny with a small piece of solder on the top.
The Ecoheat heat gun has a switch on the handle. There are two positions for the switch. Position 1 – slow. Position 2 – fast.
I used position 1 – slow.
I positioned the heat gun about 1 inch away from the penny and turned it on.

After about 40-45 second the solder started melting. After 50 seconds the solder melted completely.

To protect the motherboard from the heat I used a regular cooking aluminum foil. I cut off a piece of aluminum foil and folded it a few times to make my protection shield thicker. After that I cut off a square opening right in the middle, same size as the NVIDIA chip.
After I removed the heat sink, I had some old thermal grease stuck on the NVIDIA graphics chip. You can remove old thermal grease using alcohol swabs. It’s not necessary to make it perfectly clean. Just make sure there are no large chunks of thermal grease on the chip.

UPDATE: Some people mentioned that I should have applied some liquid flux underneath the NVIDIA chip for better results. I didn’t do it this time. I’ll definitely do it next time if the motherboard fails again. I found this video explaining how to apply liquid flux under the GPU chip. This video was made for Xbox 360 motherboard but should apply to any laptop motherboard too.
Liquid flux for GPU reflow available on eBay.
Finally, I positioned the heat gun above the NVIDIA chip about 1 inch away and turned the heat gun into the position 1.

After 50 seconds I turned it off and let the motherboard cool down for about 20 minutes.
Don’t forget to apply new thermal grease on the NVIDIA chip when you install the heat sink.
Some laptops use thermal pads instead of grease. If that’s the case with your laptop, make sure the thermal pad positioned correctly.
After I assembled the laptop back together, the video started properly!
The NVIDIA graphics chip problem fixed!
Will it last for a long time? I don’t know. Still testing.

READ THIS BEFORE REPAIR
Make sure to visit The NVIDIA GPU Litigation site.
It’s possible that your HP/Compaq laptop qualifies for a free replacement. Here’s a quoted from the site:
If you have an HP or Compaq notebook computer, you may be eligible to receive a replacement computer. A repair remedy is not available for HP/Compaq computers because replacement parts are not available. Replacement computers will be shipped 6 to 8 weeks after a claim is approved.

                                                                         by laptoprepair101

Monday 21 February 2011

Toshiba Satellite A75 failed power jack workaround

Today I received an email from Tony Sakariya (tsakariyaATyahooDOTcom) who was experiencing a problem with the power jack on his Toshiba Satellite A75 laptop. He’s been able to fix the problem by relocating the power jack outside the laptop case away from the system board.

I would like to share with others a tip for repairing their Toshiba A75 laptop for the DC Jack and battery charge problem.
I have a Toshiba A75-S209 for a year now. After the first 3 months it developed the exact same problem. Battery would not charge and I had to twist and turn the power jack to make the connection. Since it was in warranty, I returned it and they repaired and sent it back to me. The problem recurred again after about 4 months and I sent it again and they repaired it and worked fine for 5 more months and it failed. This is a design flaw with Toshiba. Now that I am out of warranty, I decided to repair it myself. Your guide for dismantling A75 was awesome. Thanks for the info. Now here is what I want to share with others. Resoldering the power jack with a new one does solve the problem for a while but it will reoccur. Hence I decided to bring out a wire with the Jack outside. Of course it looks dirty but it is a permanent solution. I am attaching the photo of the repair I did. I got the DC jack from ebay and insulated it with a electrical insulation tape. Now it is working fine, I do the connection and disconnection on the dangling power jack outside the laptop and hence no chance of breaking the soldering outside.


Laptop failed power jack fix

• Coil the pair of wire one round through the ventilation grill before taking it out as shown in the picture above. This is to prevent any external shock or force being directly transmitted to the soldering joints.
• Now we need to connect a new DC Jack to other end of the wire. I purchased the new DC jack from here for a price of $6. Shown in the picture above the white wire is the positive terminal (+) and hence must connect to the inner ring of the DC Jack. Similarly the blue wire being the negative terminal (-) should connect to the outer ring of the DC jack. Refer the picture below on how the wires are soldered to the DC Jack. Be careful not to short the leads as they are very close.
Power Plug Fix
• Now neatly wind a round of insulation tape over the wire and especially on the exposed DC Jack exterior. This will prevent any short-circuit and also give a better appearance.
New Power Jack Assembled
Toshiba Satellite A70/A75. Disassembly guide with pictures.
Valued Comments.
Submitted by Binney:
The workaround relocates the jack externally. When I did this, a short occurred between the metal casing on the top cover (the one removed with the guitar pick). This happens if the solder repair is too tall. I covered my repair with electrical insulation tape and that fixed the problem. It took me quite some time to figure out where the short was and would like to save others the headache.

Comments #282, 286 submitted by Jake and John:
Size N: DC Power Jack #274-1576 from radioshack works perfect and looks great. Costs $2.99, easier to solder, snugger fit, 5.5mm O.D. x 2.5mm I.D.
Here are some pictures of the end result of the repair with
the Radio Shack type jack. I added one of those quick release
key holder that I had lying around as a retention holder.
Here is what it looks like unplugged: Power tip unplugged.
Here is what it looks like with the adapter plugged in and
the key holder reattached: Power tip plugged.

                                                                                   by laptoprepair101

Laptop turns on for a few seconds and then shuts down. No video appears on the screen.

Today I was able to fix a “dead” notebook simply by reseating connectors. The customer brought in Compaq nx5000 notebook with the following complaint:
“Laptop shuts down on power up. When the power button is pushed, the laptop flashes green lights for several seconds and then powers down. Unit will not stay on with battery or when plugged in”.
I plugged the AC adapter and tried to turn on the laptop. After I pushed on the power button, fans started spinning and were active for a few seconds and laptop just turned itself off. The video never came on. I tried to power it on for a few times with the same result.
Here is how I fixed it.
First of all I tried simple stuff: remove the battery and start the laptop with AC adapter plugged in, reseat and swap the memory module, remove the hard drive, the DVD drive, the wireless card. Nothing helped to start the laptop normally. After that I went a little bit further. I opened up the laptop case, removed the LCD screen assembly and reseated the video card and… Surprise, surprise, the laptop started fine with an external monitor attached. Just in case I restarted it 3-4 times and each time I got video on the screen. After I assembled everything back, one more surprise was waiting for me. The laptop failed to boot again with the same symptoms. So, the only part that I added before it failed was the LCD screen assembly. I unplugged the video cable from the system board and the laptop started fine again with the external monitor. Now I know that the problem is somewhere inside the display assembly (of course, if the video connector on the system board is fine). The next logical step would be opening up the LCD display assembly and check if all connectors are seated properly. Bingo!!! I wasn’t very surprised, but I was very happy. The video cable was half-way out from the connector on the back of the LCD screen. The laptop started perfectly fine as soon as I plugged the video cable back in place. Fixed!
That was my first experience when improperly plugged video cable prevented entire system from booting.

Very strange hard drive failure symptoms

A few days ago I had to repair a notebook with symptoms that didn’t look like a hard drive failure at all. But the problem was fixed after I replace the hard drive.
Hard drive failure
It was Toshiba Satellite A70-S249 notebook with the following problem.
When I press on the power button, the laptop starts up as usual and a red Toshiba logo appears on the screen. After a moment the logo disappears and the screen turns black without any faint image and flashing cursor. The blue light around the power button stays on and fans continue to spin normal but nothing appears on the screen. I noticed that the hard drive LED blinks green on the startup and after that shows no activity at all. After a closer inspection I noticed that the screen is not completely black (like dead black), it didn’t have any image on it but it had a very faint backlight (I would say about 3-5% of normal brightness). I was able to see that there is some backlight after I pressed on the lid close switch and the screen turned to completely black.
Here are my troubleshooting steps that I went through to find the problem.
First of all, I replaced the memory module and didn’t get any changes. Removed the wireless card, still had the same problem.
After that I removed the hard drive and started the computer. This time I got something. The notebook successfully passed the Toshiba screen and started looking for a boot device. I got some activity on the screen. To make sure that the notebook itself works fine, I booted it from Knoppix (live Linux CD) and successfully loaded the Linux operating system to the desktop. So, that’s the hard drive problem!
I installed the hard drive back in the laptop and tried to boot it again. The same failure occurred again; I got a black screen with a very faint backlight and no hard drive activity at all. I tested the hard drive with Hitachi DFT test and failed an advanced test. The problem is detected!
Finally I installed a new hard drive, reimaged the drive with a recovery DVD and got the laptop back up and running.
By the way, even though the customer’s hard drive failed the DFT test, I still was able to access it from another computer. The customer had important personal files on the failed drive. I connected it to our recovery desktop computer using IDE adapter. The “failed” hard drive was detected without any problem and I was able to recover the data.

                                                                               by laptoprepair101

Thursday 17 February 2011

Fix Laptop Screen By Yourself

We can certainly refer laptop repair manual guide to fix laptop screen.In case your laptop LCD screen is not displaying anything and is blank or that the screen is probably shattered, don’t worry as there is still some hope for you.It is not that difficult to repair lap top screen, it is much easier than you thought. If it is possible for you to handle a mini screw driver and read an easy diagram then you’ve gotten all the mandatory skills to fix your own laptop screen. A substitute or a replacement screen is necessary if your screen is shattered completely. A few things you might have considered trying to test when there isn’t any picture are the level of brightness in the laptops and whether the image displays when linked to an external monitor. The level of brightness is generally adjusted by a  key combination in the keyboard, dedicated buttons or on the BIOS. If ever the notebook shows video on being connected by an external monitor then almost definitely the LCD or perhaps a component within the LCD might be dead or faulty. So from will you get the parts? the best place to buy the parts is from ebay.
Certainly one of the easy and simple replacement screen options is to search for an entire laptop lid that features a functioning LCD screen. Now you take off your laptop lid, by taking off the plastic cover , and then removing the screws, and now you disconnect the cable out of your motherboard as well as in some cases the built-in wireless card antenna wire. Now you put the replacement lid. Another option that i see is to exchange only the LCD screen with the lid. This choice is a little more harder and involves dismantling within the lids LCD screen housing components. It normally involves removing the stickers that conceals the screw holes, after that you have to remove the screws and finally the plastic casing that covers the LCD screen. In case you are uncertain about dismantling your laptop many of the prime laptop companies provide, the servicing manuals along with diagrams easy method to dismantle the laptop.You can download it through the Internet.
When you make an ebay purchase don’t forget to read the listing details and make certain that the model of the laptop matches what the vendor is selling. If you want to buy from other place instead of ebay, then you certainly can but it will be very expensive, and only the parts of new models will be available. It is very difficult to get parts of the older models.You can also refer some Laptop repair manual for further instructions to fix laptop screen.

Laptop Monitor Repair – A Few Guidelines And Tips !

Laptop monitor repair can be done at home by simply referring a good laptop repair manual. Do you feel like there is something wrong with your monitor and there is no visual displaying on the LCD screen. Will you be able to imagine a worse circumstance than this? And suppose if your monitor screen is totally shattered? It sounds like a dooms day kind of situation for your laptop, doesn’t it? But don’t worry; it is probably not as hopeless as it may sounds. The answer is likely to be as simple as a tiny-screwdriver.
Get hold of a tiny-screwdriver as well as a diagram of the laptop. That’s it you are a self proclaimed laptop monitor repair technician. You ought to be able to repair your own personal laptop monitor. Needless to say, for the above mentioned shattered screen situation, replacing your notebook screen is the only alternative situation for you.
Laptop Monitor Repair Suggestions.
Let us take a look at the blank screen situation of your laptop monitor repair. You initially have to test the brightness adjustments of your notebook, just to make sure. In addition to that, examine the image by attaching your laptop to another monitor, to check if you receive any pictures. To check out your brightness degree of your laptop, you have to type a combination of keyboard keys, or a fixed button that you simply have to press to adjust the brightness levels. An alternative choice that I see is the settings from the BIOS. At this moment, in case your laptop gets an image when attached externally to an outside monitor, in that case your laptop’s LCD or an integral part of your LCD is gone or is working correctly. If that is so, then you have to visit the e bay store and then get the best deal on laptop parts.
The best deal will be to stumble upon a laptop lid with an LCD screen all ready to be installed. In that case you only have to take off your own personal faulty laptop lid with the hinge screws. Pull out the video cable out of your motherboard. A few laptop models will have to take some extra steps of removing the built-in wireless card antenna cable. After that comes the simple part. Take the laptop lid which you bought from e bay or any other store and assemble it in the precise opposite steps that you choose to took to detached the initial one.
For all those of you who prefer to complicate things a bit, you can actually just take out the LCD from the lid. You will have to remove the LCD screen out of the lid on both units. To get further details you have to visit the laptop manufacturer’s website and then download the service manual. Usually these kinds of service manuals have all the required diagrams to guide you.
In conclusion, I’d like to warn you that whenever you happen to be looking for parts to interchange, either on e bay or in a different place, at all times make certain that the part you are searching for matches the brand and model of the laptop, because many parts are not compatible with all kinds of laptops with each other, so t his will cause you more additional problems. Furthermore, if the model of your laptop is new you will get the parts directly from the manufacturer, but you will have to spend some money on it.
I personally repair my laptop without hiring a technician. I accidentally stumble upon a great laptop repair manual course. It’s an easy step by step guide with videos to help you repair you own laptop as well as you can start you own laptop repairing business with this. And on top of that it comes with a money back guarantee. You can check out the site here


                                                                                    by laptoprepairmanual

Laptop Battery Mod - Adding a Secondary Battery

From 1h 45m of battery life to 6 hours of battery life using some junk from my basement and a used Dell laptop battery.

This mod was done on an Asus Z7100 series laptop (Z71V to be exact). But the theory behind this mod should work on pretty much any laptop, notebook or netbook out there. It worked out better than I ever expected.

    Step 1: Open the Laptop Battery.

Asus A42-M7 70-N9Q1B1100 M7 M7V Z70V Z7000V Z7100V Z71V i5500S i5500V battery opened dissected modified hacked

Open Asus Z71V Battery Pack (Model No. A42-M7)

 
    Opening the battery pack is probably one of the more challenging parts of the project as most battery packs are sealed/glued/welded shut.
    I started mine by cutting into the seam at the corners of the battery pack with a utility knife. I managed to get a flat screw driver into the incisions I made with the knife and started to pry the case open. Be very careful to not push the knife or screw driver too far into the pack as you could damage the batteries or battery controller PCB. I pushed my screw driver in too far and knocked a tiny resistor off my PCB. Took me half an hour to get it soldered back on.
    Once you have the battery pack open, inspect how the batteries are wired up.
 
Asus battery 18650 cells

There are Eight 18650 Cells. A red wire for the + end of the series and a black wire for the - end of the series. white, yellow and orange wires for the intermediary charging points.

 
        It is an 8 cell battery that has 2 rows of 4 cells. The batteries inside are Samsung Lithium-Ion 18650 sized cells with an output of 3.7v at 2200 mAh each. They are wired in 2 parallel series' of 4. The specs on my battery state 14.8v with 4400 mAh. Since the batteries are 3.7v each and there are 4 batteries in each series, 4 * 3.7v = 14.8v. There are 2 of these 14.8v series wired parallel to each other. This gives us 2 * 2200 mAh for a total of 4400 mAh at 14.8v.
Asus A42-M7 70-N9Q1B1100 battery rating

14.8v and 4400 mAh (milliampere-hours)

 
    After around 3 years of use, this battery had degraded to around 28000 mWh according to Notebook Hardware Control (NHC). It only lasted 100 minutes or less; compared to 3 hours+ of runtime I used to get.
 
You need to acquire more batteries. Most people will probably have to purchase new batteries but I had some used Dell laptop battery packs lying around that I could cannibalize. I thought I would try one of them out first before buying new batteries.
 
Dell Inspiron 2650 Laptop battery about to be opened

A Dell Battery; Model# BAT3151L8. Note The "Do not disassemble" Warning :)

 
    I chose one that appeared to be in good condition, it was for a Dell Inspiron 2650 series laptop. It happened to have very similar specs to my Asus battery - 8 cells rated for 14.8v. I opened it up and verified that it was in good shape. More on this battery later.
    Most people probably don't have spare laptop batteries lying around, and you will get best results from new cells anyway. However 18650 cells are going to be hard to find at most stores and you will probably have to purchase these online. You can actually buy them for a very reasonable cost online from dealextreme.com, which is a huge online store with free worldwide shipping.
 
Blue TrustFire 2500mAh 18650Red UltraFire 3000mAh 18650

I personally like the Blue TrustFire 2500mAh 18650 cells and was tempted to try out the Red UltraFire 3000mAh 18650 cells.

 
    The amount of batteries you will need depends on your current battery. Always add additional batteries in an even multiple of the original amount of cells. If you have a 3 cell battery, you can add 3 more, 6 more, 9 more .... if it is a 4 cell, add 4 more, 8 more, 12 more, etc.
    Make sure the cells you buy provide the same voltage as the original cells in your battery pack are (usually 3.7v). You may go as high or low as you like for the mAh rating. The higher the rating, the longer the battery will last (theoretically). Some manufacturers exaggerate a bit on the mAh rating. Trustfire seems to be a safe choice.
    Also, stay away from "protected" cells, as your laptop battery controller already provides protection. The cells with additional built-in protection can cause the whole battery pack to stop working early if the protection on one of the cells gets tripped.
    If you are going to be using your newly purchased cells as a secondary external battery, you may also want a protective case to enclose them in.
 
18650 battery cases

Pretty much anything should work but DealExtreme.com has specially made 18650 battery cases for cheap.


Removable second laptop battery using molex connectors

For future expansion and portability reasons, I wanted the second battery to be removable.

 
    I though it would be a good idea to make the secondary battery removable instead of hard-wiring it in. There is a total of 5 wires connect to the second battery, but I couldn't find any 5 pin connectors around so I used two 4-pin molex connectors and just removed the 3 spare wires from one connector. I salvaged these connectors from some old computer fans. These are the 'male' ends of the connector.
Asus laptop battery mod wiring preperation

To bring the wiring out from the main battery I melted a small hole in the battery case with a soldering iron.

 
    I inserted the wires and cut them to length so that each wire could reach its intended soldering point.
wiring a second removable laptop battery

The wires should be inserted before you start soldering them to the battery.

 Carefully solder the wires to the existing solder points on the battery. I first attempted to solder the wires directly to the battery cells but the solder would not stick so I made use of the existing solder points and it is working fine.
Soldering battery harness

This is the + end of the battery series, I labeled this solder point #1. The - end was #5. The intermediary points were 2, 3 and 4.

 
    I placed the cells back in the battery case partway through the soldering process so I could keep the wiring as tight as possible. My battery case has very little room to work in so I needed to keep the wires as short as possible. Be sure to keep track of what wires you connect where, and mark the corresponding pins on the molex connectors.
 
Asus battery soldered and ready for expansion

All 5 wires soldered on. I labeled the molex connectors to correspond with which solder point they were connected to (You can't see this, they were labeled on the other side).

 
Fitting the battery back in the case

It is a really tight fit.

 
    The soldering points were originally covered by tape to prevent any accidental shorts with the PCB.
Closing the battery case

Before I closed the case I reapplied tape over these solder points.

 
Modified battery installed

I taped the battery shut instead of gluing it, mainly because this is much faster and easier.

 
    Now would probably be a good time to make sure it still works. My laptop powered up fine, so now I am ready to work on the second battery.
As previously mentioned, I will be using an old Dell laptop battery. You will probably get much better results if new cells are used, but I already had spare laptop batteries lying around so I thought I would try them first.
Inspiron battery opened

The battery controller will not be used. It should be removed.

 
    There is a total of 8 Cells; you can't tell from the picture but they are arranged in 2 parallel series' of 4 cells each. Exactly like the Asus battery. There are 5 wires a red +, a black - and 3 intermediary wires for charging purposes, blue, white and yellow.
removable secondary battery

The existing wiring removed and the 'female' end of the molex connectors soldered on.

 
    I salvaged some more molex connectors from an old computer power supply. I cut these wires to length and soldered them to the solder points on the battery. I made sure to keep the wiring the same as I had done on the asus battery. Positive going to Positive, negative to negative, and each intermediary charging wire going to their corresponding locations. If the wiring is messed up in any way, bad things will happen. The best case scenario would be that it simply doesn't work. Worst case scenario - there will likely be fires and/or explosions. Do it right, I am not responsible for any damage caused.

To be safe I taped over the contact points like I did with the Asus battery.

    This battery had much more room to work in compared to the Asus one. The project is almost complete, all that needs to be done is to close up the secondary battery and connect it.
 
 I taped up the secondary battery and attached it with some stick-on velcro strips I picked up for $1.25 (which is actually the only money I spent on this project). It holds the battery on very strongly, almost too strong ..... I almost couldn't get it off again!
Secondary removable battery added to Asus laptop

The finished product.

    At first there seemed to be no change in battery life, but after the 2nd rundown and recharge, NHC showed that the full battery capacity had increased to 36000 mWh.  After the 4th rundown and recharge it had increased to 46000 mWh, after the 5th, 54000 mWh, the 6th, 61000 mWh, 7th, 69000 mWh. The battery sensor is still calibrating but I am now getting a consistent 6 hours of battery life! This is almost double what I got with a single battery when it was brand new.
from 28000mwh to 61000mwh NHC screenshot

6 hours of battery life from two old laptop batteries.

  I believe the reason the battery life has increased beyond what I though possible is due to how some Lithium-Ion batteries work. The higher the resistance (amps), the lower the battery life (mAh). According to NHC, my laptop draws an average of about 17 watts from the battery. Watts = Amps * Volts. So 17w / 14.8v = 1.15a. With the original battery, The 1.15 amp load was divided into two 14.8v series (four 3.7v cells per series). This gave a load of 0.575 amps per series. Now the load is divided into 4 series of 4 cells each (16 cells total). This brings the load down to 0.2875 amps per series. I'm guessing that higher amp requirements caused these batteries to lose their mAh rating much faster than a lower amp requirement. With the amps now spread out between 16 batteries (0.072 amps per battery), this is allowing the cells to produce optimal performance. This idea comes from a chart posted in this thread (page 2). Note the results for the two 3000mAh cells.
I could be totally off on my theory, but whatever the reason is for the great battery life, I am very happy to have such great results.

adding more laptop batteries. 24 cells?

Next project..... adding a third battery!

    How will 24 cells work? 28 cells? I'm hoping to find out.
                                                                                 by sites.google.com