Wednesday 16 February 2011

How to troubleshoot and fix laptop video problems

Here are some tips and tricks for troubleshooting and fixing laptop video problems. Video issues are very common within portable computers and with the following tips you should be able to detect and eliminate basic laptop video problems.

Laptop LCD screen has a faint image.


Look at the LCD screen very closely and check if you can see a faint image on the screen. It’s possible that the LCD lid close switch stuck in the “closed” position and the backlight stays off even when you open the LCD screen or turn on the laptop. The switch turns off the backlight when you close the LCD display to save the laptop battery power. Check the LCD lid close switch. Usually it is a small plastic pin located close to the LCD hinges. Try to tap on the switch a few times to turn on the backlight. If after tapping on the LCD lid close switch the backlight stays on, you fixed the problem.
It is also possible that after tapping on the LCD lid close switch the backlight works fine, you see a normal video on the screen for some time and then the backlight turns itself off again. In this case I would blame the FL inverter board. Try to reseat cables on both end of the FL inverter to make a better contact between the cables and the FL inverter board. If it doesn’t help I would try to replace the FL inverter board.

Laptop LCD screen is solid white color.
Screen is white
Most likely it is just a bad connection between the LCD display and the system board. I would try reseating the video cable connector on the back of the LCD screen first and check if it fixes the problem. After that I would try reseating the video cable connector on the system board. I would also try reseating cables if there is no video on the LCD screen at all.
The video on the LCD screen is garbled.
Bad image on laptop LCD screen
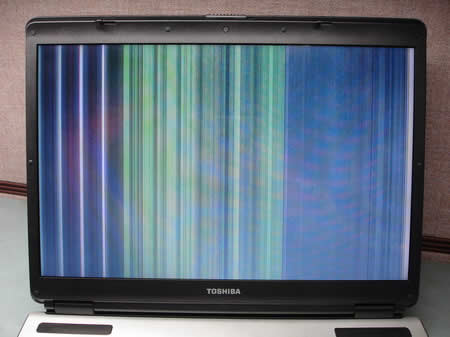
Try to connect the LCD screen to an external monitor. If the external video is fine, you have a problem with the LCD screen or the LCD video cable. You can try to fix the problem by reseating the video cable on the back of the LCD and on the system board.
If you see the same garbled video output on the external monitor most likely it is not the LCD screen problem. In this case the system board (with onboard video) is bad or the video card is bad.
I understand that these tips will not cover all video problems with portable computers. If you have a different problem, you are welcome to leave a comment and I will try to help you if I can. :)
Are you looking for a new LCD screen for you laptop? Try searching here.

                          by laptoprepair101

Laptop screen shows strange colors. What could be wrong?

Laptop screen started showing strange or wrong colors. What could be wrong? I’ve been asked this question many times and today I’m addressing the issue.

In this post I explain some basic troubleshooting techniques in case if your laptop screen started showing strange or incorrect colors.
You have to know how to disassemble the laptop in order to use following troubleshooting techniques.
TEST LAPTOP WITH EXTERNAL MONITOR.
The main step is testing how laptop outputs video on an external monitor (or TV).
You can connect your laptop to an external monitor using VGA cable, DVI cable, HDMI cable or S-Video cable, it depends on a type of connector you have on the laptop. Most laptops have VGA connector, so it would be the most common way to connect.
In my example I’m connecting to an external monitor via VGA connector.

Some laptops detect external monitor automatically and start showing image on both screens right from startup.
Other laptops can detect the monitor but display image only on one screen (internal or external). In this case you’ll have to switch video between internal and external using the Fn key and one of the F* keys in the top row of the keyboard. This combination varies for different laptop brands, for example it’s Fn+F5 for Toshiba, Fn+F4 for HP, Fn+F8 for Dell, Fn+F7 Lenovo etc…
WHAT VIDEO ON EXTERNAL MONITOR CAN TELL?
If both, the internal screen and external monitor (or TV) show strange or incorrect colors or any other image distortion, this is the graphics card failure.
If only the laptop screen shows strange colors or any other distortion but external image appears to be normal (as in my example), the problem is somewhere inside the laptop display. It could be bad connection, bad LCD cable or bad LCD screen.
Let’s narrow down the problem one by one.
TRY RESEATING LCD CABLE CONNECTOR ON MOTHERBOARD.

The laptop screen receives data signal from the motherboard via LCD cable. If the LCD cable not making good connection with the motherboard, it might cause image or color distortion on the screen. Try reseating the LCD cable connector and see if it fixes the problem. Make sure the LCD cable connector plugged correctly.
In most laptops the LCD cable connector located under the keyboard bezel (aka keyboard cover). If it’s not there, most likely you’ll find it somewhere under the keyboard.
WIGGLE THE LCD CABLE.
The LCD cable runs inside the laptop display, under the LCD screen. For this test it’s necessary to disassemble the display, so you can access the cable.
A pinched or damaged wire inside the LCD cable also can cause color distortion.

Try wiggling the LCD cable while the laptop is running. If wiggling the LCD cable affects image on the screen in any way (it starts shown different colors, lines, or image clears to normal, etc…) most likely the LCD cable is defective and has to be replaced. Try replacing the cable.
On the other hand, if wiggling the cable doesn’t affect image on the screen at all, most likely the cable is good and your problem related to the LCD screen failure. In this case you’ll have to replace the LCD screen.
APPLY SOME PRESSURE TO THE DISPLAY.
Try applying some reasonable pressure to the top part of the display assembly. Squeeze it with your fingers.

If the screen starts showing different colors, lines, or clears to normal when you squeeze the top part of the display panel, most likely this is LCD screen failure. In this case you’ll have to replace the LCD screen.


Why laptop runs hot and turns off or freezes?

My laptop runs very hot and eventually turns off or freezes – this is one of the most common complaints I have been receiving from my customer for many years. Why it’s happening? Is there an easy fix for that?
Most likely this problem is heat related. Take a look at the following picture.

Any laptop has a cooling module which consists of heatsink and cooling fan. When laptop is working, the processor (CPU) heats up and because of that the heatsink is getting hot too. At some temperature level, the fan kicks in and cools down the heatsink.
The problem starts when the laptop cooling module collects too much dust inside. Usually dust collects between the fan and heatsink. Dust clogs the heatsink and kills normal airflow inside the cooling module. Eventually, the processor gets very hot and the laptop turns off unexpectedly or freezes. This problem can be fixed by cleaning the laptop cooling module.
Cleaning laptop cooling module.
Some laptops give you an easy access to the heatsink and fan. In laptops like that you can access the cooling module through the bottom cover.

In my example I had to remove the cooling module. Otherwise, I wouldn’t be able to remove the fan and access the heatsink. In some laptops you can remove the fan without separating the heatsink from the CPU.
After I removed the fan, I found a thick layer of dust inside the heatsink. Cleaning the heatsink should fix any heat related problems.

Apply thermal paste on the processor.
If thermal paste on the processor dried out, you should replace it with fresh thermal paste.

Remove old thermal paste from the processor and heatsink using alcohol swab.
WARNING: In some laptops the heatsink also covers the graphics chip. The part of the heatsink which covers the graphics chip might have thermal pad on it instead of regular thermal paste. Do not replace thermal pad with thermal paste! Do not apply thermal paste on the thermal pad! Just leave thermal pad alone and apply thermal paste only on the processor.
I usually use Shin-Etsu thermal paste which is relatively cheap and performs well.

After applying new thermal paste, install the heatsink and fan back into the laptop. Do not forget to connect the fan cable to the motherboard!
What if cooling module cannot be accessed easily?
In some laptops the cooling module is buried deep inside the case and cannot be easily accessed and removed. In order to remove the cooling module it’s necessary to disassemble the whole laptop but it’s only for experienced users.
In laptops like that you can use the following technique:

Buy a can of computer compressed air.
1. Blow air into the fan grill on the bottom of the laptop.
2. Blow air into the grill on the side of the laptop.
Switch direction a few times until all dust is gone. Most likely this quick cleaning will fix your laptop overheating problem.

Laptop Repair Video Collection - 10 hours of high quality video explaining how to troubleshoot and repair most common laptop problems. Only $54.95. 60 day money back guarantee.

If you find this article useful, please consider making a donation to the author. Thank you!

        by laptoprepair