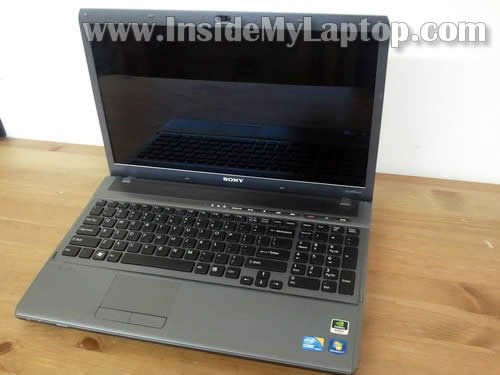
In the following guide I’ll be taking apart a Sony Vaio VPCF1 laptop. I’m doing that in order to remove and replace damaged LCD screen. In this guide I’ll show how to remove laptop keyboard, media button board, speakers and of course LCD screen.
The full laptop model name is Sony Vaio VPC-F11KFX/B.
Also, there is another model number listed on the bottom: Model PCG-F1114L.
It’s possible my guide will work for some other Sony Vaio laptops. If it works for you, please mention the laptop model number in comments after this post.
Before you start make sure the laptop is turned off and battery removed.
STEP 1.
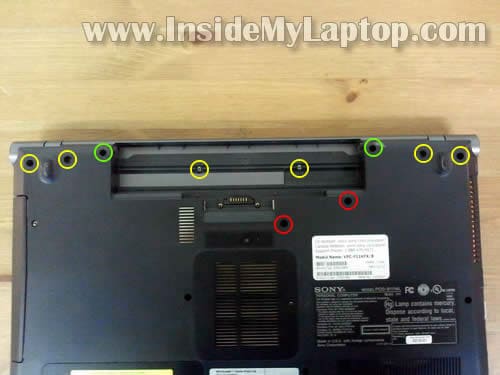
Remove six (yellow) screws securing the media button board cover.
Remove two (red) screws securing laptop keyboard.
Remove two (green) screws securing display hinges.
STEP 2.
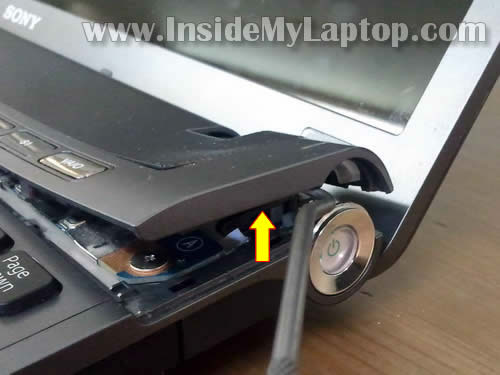
Carefully lift up the media button board cover with a sharp object and continue removing with your fingers.
STEP 3.
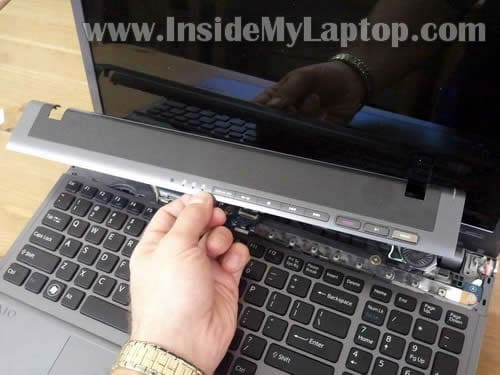
Media button board cover removed.
STEP 4.
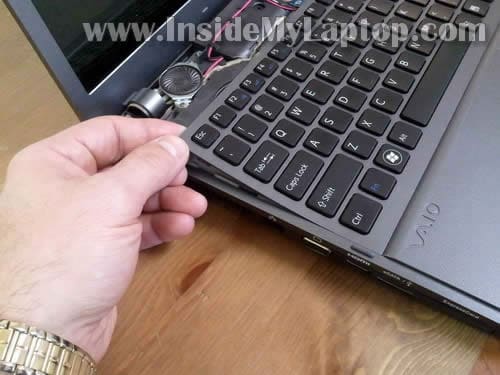
Carefully lift up one corner of the keyboard.
STEP 5.
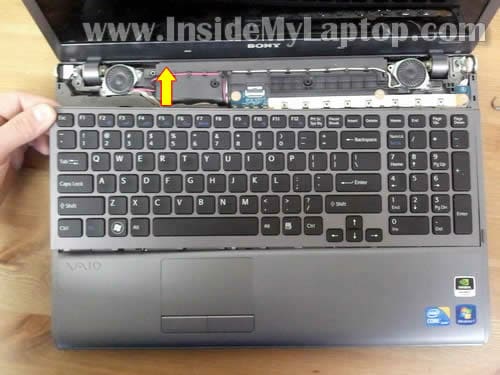
Slide the keyboard towards the LCD screen and at the same time lift it up.
STEP 6.
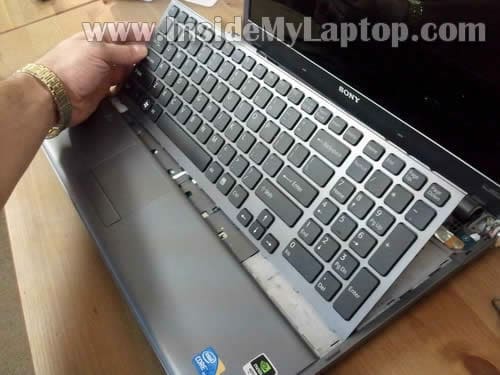
Place the keyboard upside down on the keyboard. Be careful, the keyboard still connected to the motherboard.
STEP 7.
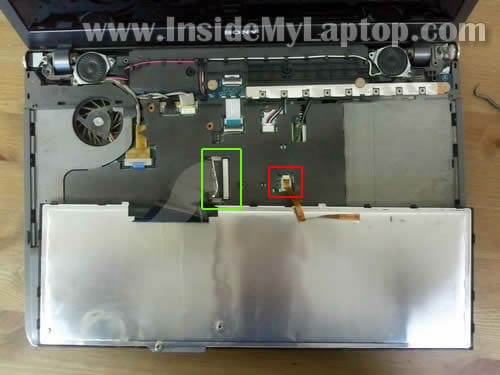
Now you can access keyboard cable connectors. You’ll find two cables connected to the motherboard.
STEP 8.
There is no lock securing the cable on the small connector. Simply pull the cable from the connector.
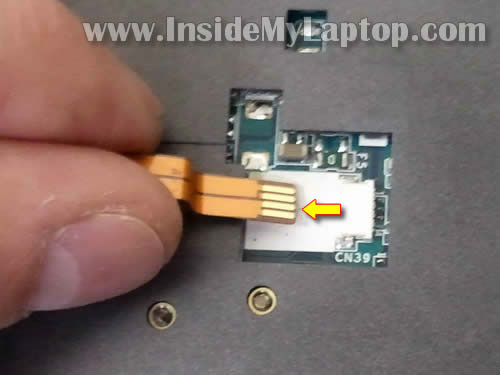
STEP 9.
The big connector has to be unlocked first.
Move the brown locking piece about 2 millimeters away from the white base.
The locking piece MUST stay attached to the connector base.
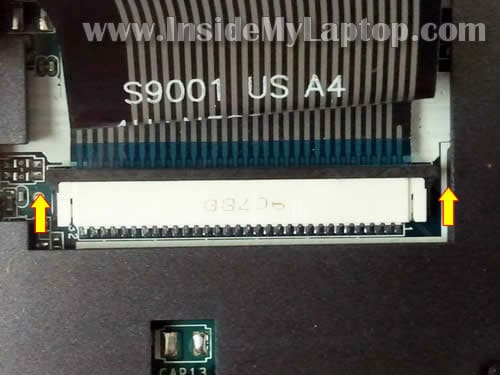
STEP 10.
On the following picture the connector is shown in the unlocked position.
Now you can pull the cable from the connector.
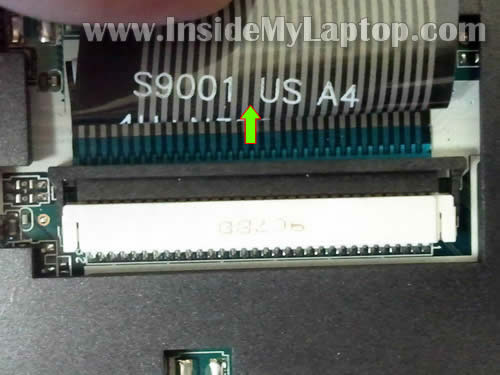
STEP 11.
Remove the keyboard.
If you need a new keyboard for your Sony Vaio VPC series laptop, you can find it here.
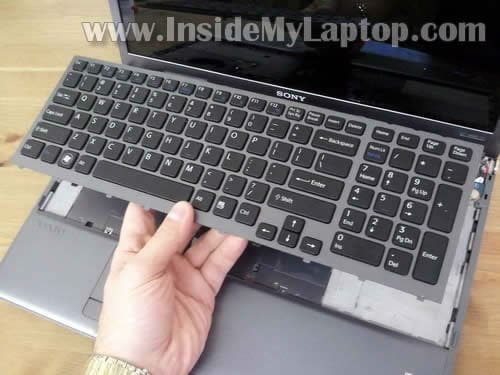
STEP 12.
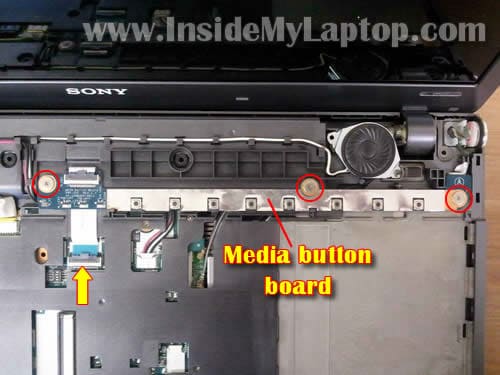
Remove three screws securing the media button board.
Disconnect the media button board cable from the motherboard.
STEP 13.
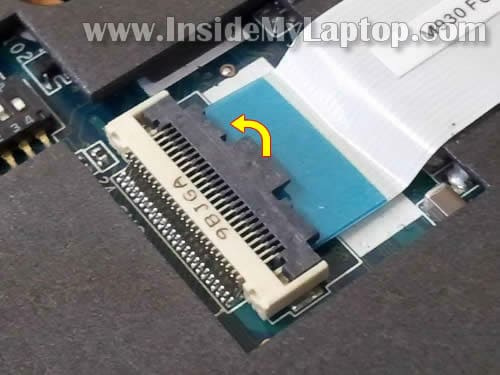
In order to unlock the connector, you’ll have to lift up the right side of the locking tab so it opens up at a 90 degree angle.
STEP 14.
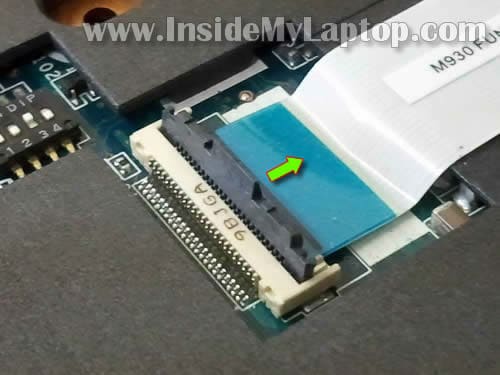
On the following picture the connect is shown in the unlocked position. Now you can pull the cable from the connector.
STEP 15.
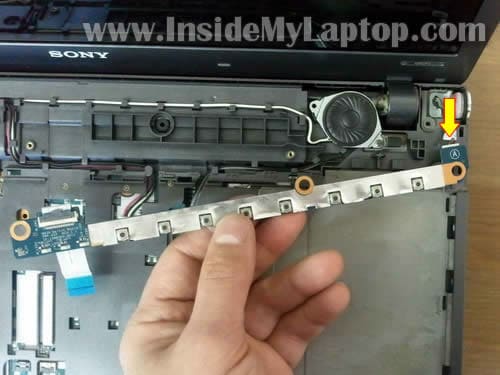
When you remove the media button board you’ll have to disconnect one more cable.
STEP 16.
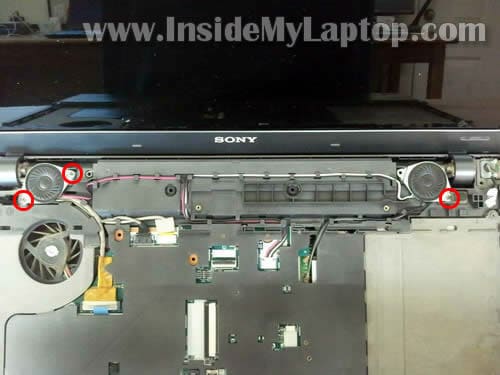
Remove three screws securing laptop speakers.
It’s not necessary to remove the speakers completely. Just turn them upside down so you can get access to the hinges.
STEP 17.
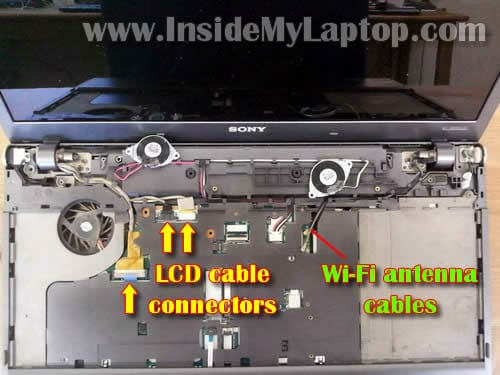
Disconnect display cables from the motherboard.
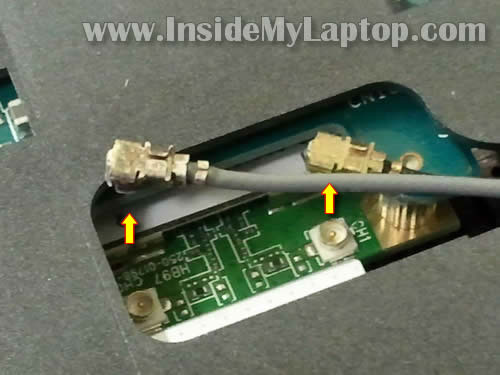
Disconnect wireless card antenna cables from the wireless card.
In order to disconnect the cable, grab the gold connector with you fingers and pull it up.
STEP 18.
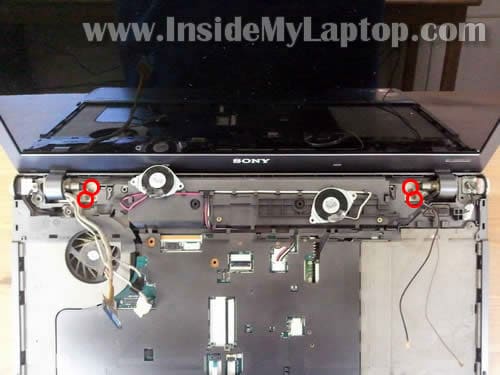
Remove four screws securing display hinges to the laptop base.
STEP 19.
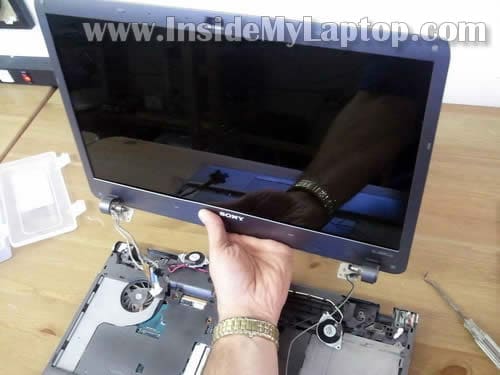
Now you can separate laptop display assembly from the base.
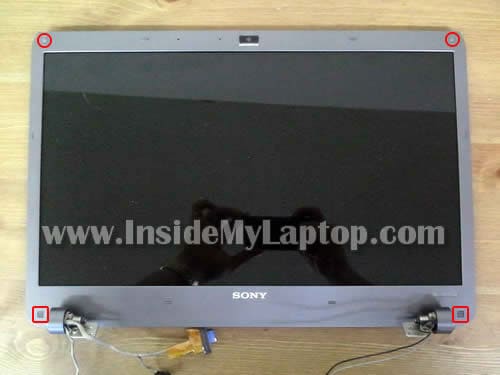
There are four screw covers on the screen bezel.
You’ll have to remove all four covers and after that remove all four screws found under those covers.
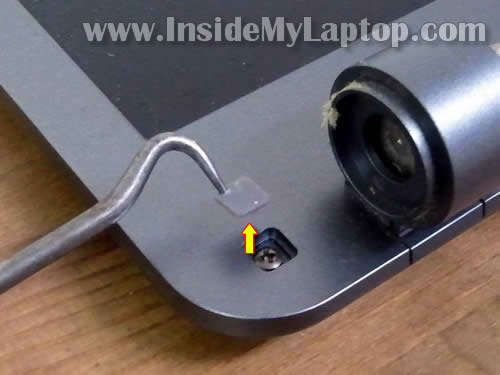
You can remove screw covers with a sharp object.
STEP 21.
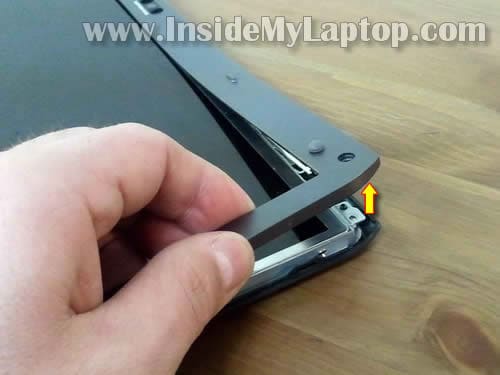
Start separating screen bezel from the display cover.
STEP 22.
Continue separating the screen bezel.
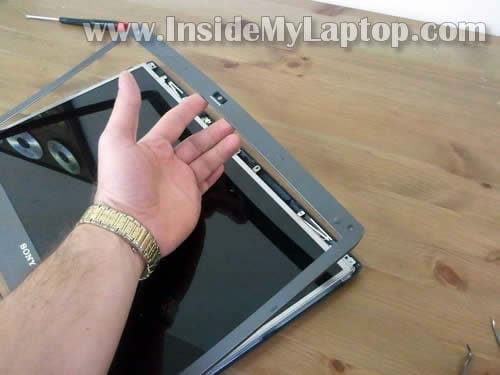
STEP 23.
The screen bezel removed from the display assembly.
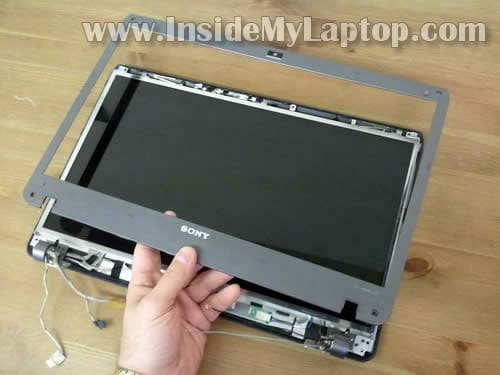
STEP 24.
Remove four screws securing LCD screen brackets to the display hinges.
Disconnect LCD backlight cable from the right side of the inverter board.
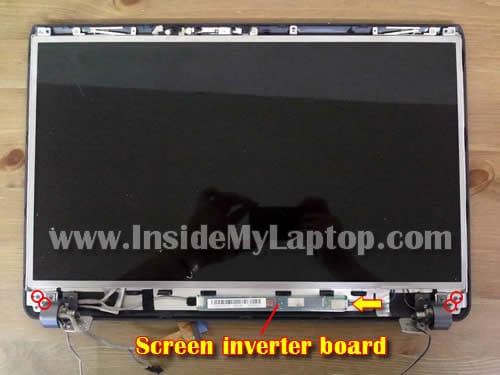
STEP 25.
Place the LCD screen face down on the table and carefully lift up the display cover.
Now you can access the video cable.

STEP 26.
Disconnect the video cable connector from the LCD screen.
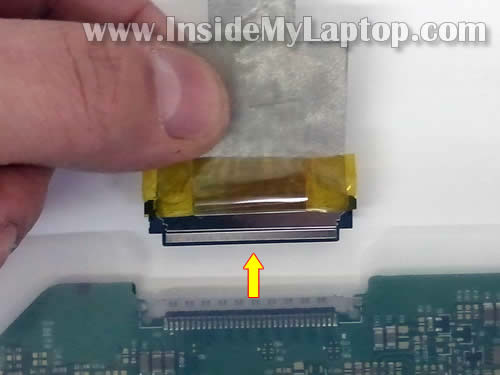
STEP 27.
Remove LCD screen.
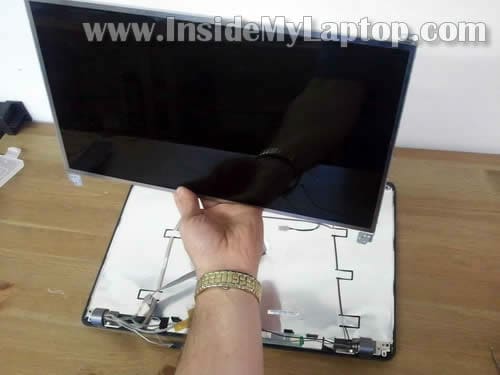
STEP 28.
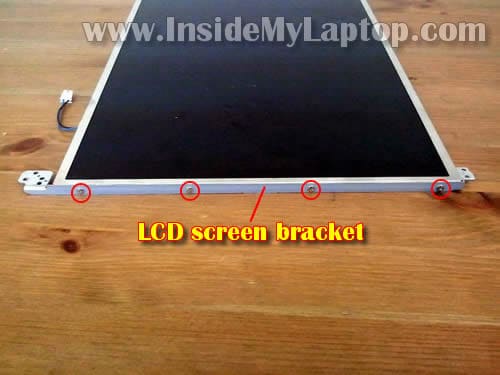
Finally, remove four screws securing the mounting bracket to the LCD screen.
Remove the second bracket on the other side of the screen.
Transfer both mounting brackets to the new screen.
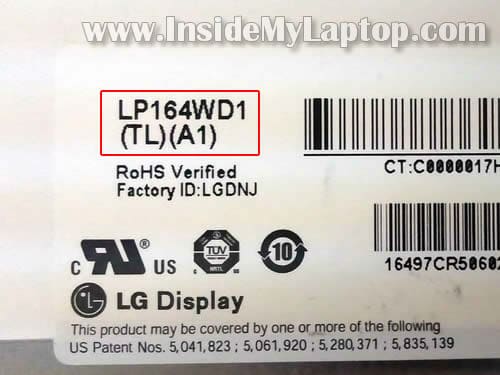
You can search for a new replacement LCD screen using model number printed on the label.
In my Sony Vaio VPCF1 laptop I had the following screen installed: LP164WD1 (TL)(A1).
I found a new screen available here for about $100.
by http://www.insidemylaptop.com/
The full laptop model name is Sony Vaio VPC-F11KFX/B.
Also, there is another model number listed on the bottom: Model PCG-F1114L.
It’s possible my guide will work for some other Sony Vaio laptops. If it works for you, please mention the laptop model number in comments after this post.
Before you start make sure the laptop is turned off and battery removed.
STEP 1.
Remove six (yellow) screws securing the media button board cover.
Remove two (red) screws securing laptop keyboard.
Remove two (green) screws securing display hinges.

STEP 2.
Carefully lift up the media button board cover with a sharp object and continue removing with your fingers.

STEP 3.
Media button board cover removed.

STEP 4.
Carefully lift up one corner of the keyboard.

STEP 5.
Slide the keyboard towards the LCD screen and at the same time lift it up.

STEP 6.
Place the keyboard upside down on the keyboard. Be careful, the keyboard still connected to the motherboard.

STEP 7.
Now you can access keyboard cable connectors. You’ll find two cables connected to the motherboard.

STEP 8.
There is no lock securing the cable on the small connector. Simply pull the cable from the connector.

STEP 9.
The big connector has to be unlocked first.
Move the brown locking piece about 2 millimeters away from the white base.
The locking piece MUST stay attached to the connector base.

STEP 10.
On the following picture the connector is shown in the unlocked position.
Now you can pull the cable from the connector.

STEP 11.
Remove the keyboard.
If you need a new keyboard for your Sony Vaio VPC series laptop, you can find it here.

STEP 12.
Remove three screws securing the media button board.
Disconnect the media button board cable from the motherboard.

STEP 13.
In order to unlock the connector, you’ll have to lift up the right side of the locking tab so it opens up at a 90 degree angle.

STEP 14.
On the following picture the connect is shown in the unlocked position. Now you can pull the cable from the connector.

STEP 15.
When you remove the media button board you’ll have to disconnect one more cable.

STEP 16.
Remove three screws securing laptop speakers.
It’s not necessary to remove the speakers completely. Just turn them upside down so you can get access to the hinges.

STEP 17.
Disconnect display cables from the motherboard.
Disconnect wireless card antenna cables from the wireless card.

In order to disconnect the cable, grab the gold connector with you fingers and pull it up.

STEP 18.
Remove four screws securing display hinges to the laptop base.

STEP 19.
Now you can separate laptop display assembly from the base.

REMOVING AND REPLACING LCD SCREEN.
STEP 20.There are four screw covers on the screen bezel.
You’ll have to remove all four covers and after that remove all four screws found under those covers.

You can remove screw covers with a sharp object.

STEP 21.
Start separating screen bezel from the display cover.

STEP 22.
Continue separating the screen bezel.

STEP 23.
The screen bezel removed from the display assembly.

STEP 24.
Remove four screws securing LCD screen brackets to the display hinges.
Disconnect LCD backlight cable from the right side of the inverter board.

STEP 25.
Place the LCD screen face down on the table and carefully lift up the display cover.
Now you can access the video cable.

STEP 26.
Disconnect the video cable connector from the LCD screen.

STEP 27.
Remove LCD screen.

STEP 28.
Finally, remove four screws securing the mounting bracket to the LCD screen.
Remove the second bracket on the other side of the screen.
Transfer both mounting brackets to the new screen.

You can search for a new replacement LCD screen using model number printed on the label.
In my Sony Vaio VPCF1 laptop I had the following screen installed: LP164WD1 (TL)(A1).
I found a new screen available here for about $100.

by http://www.insidemylaptop.com/
hi, I also have sony Vaio VPCF1 series, do you know where to get new top cover to replace? or you know the spare part number?
ReplyDeleteKeeping your laptop always clean. We are talking the physical cleaning here we have to regularly do to our laptops. Dirt and dust can easily build up on our laptops fans and motherboards and this can reduce the ability of the laptop to cool itself and function properly.
ReplyDeleteLaptop Screen Repairs
Wonderful blog & good post.Its really helpful for me, awaiting for more new post. Keep Blogging!
ReplyDeleteSony Laptop Service in Anna Nagar