For those that own a laptop, one of the most common problems users experience hardware-wise is a broken or malfunctioning laptop screen. Laptop screens are essential to anyone using their laptop computer
.Laptop screens can be incredibly delicate pieces of hardware,however, they are surprisingly very easy to fix- even if you are not a technical person.
Troubleshoot Your Laptop Screen Problem
Before you decide to go ahead and outright replace your laptop screen, it is wise to troubleshoot the problem. While obvious damage to a screen will usually require full replacement, other types of damage that are visible on the laptop screen may not be due to the screen itself. This is why before you replace the screen, definitely troubleshoot the problem.
Pixel Problems
Many times pixels will be damaged on your laptop making your screen very difficult to read and use. Your laptop uses LCD (liquid crystal display) to show images, these images are made from thousands of pixels (little dots). If a few pixels in one area are damaged, this can ruin your entire computing experience. In most cases, it is best to remove the entire laptop screen and replace it with a new one.
Laptop Screens with Faint Images
Laptop screens are back lit to improve visibility of your screen. However, sometimes the back light does not work making your screen extremely difficult to read. A common problem might be as simple as one of the latches is stuck in the closed position. For instance, if you opened your laptop, but the switch stayed stuck in the closed position, the computer will usually be on, but the backlight will remain off. First find the back light switch. These switches are usually very tiny and located near the laptop hinges. First try to open and close your laptop a few times, if this doesn't work, usually a gentle tap or using a small pin to try to gently un-stick the latch will do the trick.
Your laptop Screen Flickers or is a Solid White Color
If your laptop screen flickers on and off, the cause is probably due to an inverter problem. The inverter supplies power to the screen's backlight. Inverters are easy to replace and usually cost about $100. If your laptop screen is a solid white color, then the problem is possibly a bad cable connection between the monitor and the system board. Open up your laptop and make sure that the cables and connections are set correctly and undamaged.
Images on Screen are Jumbled
Many times laptop users will see images that are all jumbled. In most cases this is not due to the screen itself, but possibly the video card. One quick way to determine whether or not it is your monitor that is causing the screen to be jumbled is to connect another monitor to your laptop using the VGA port. If the other monitor shows jumbled images, then it is probably your computer's video card and not the monitor.
Replacing Your Laptop Screen
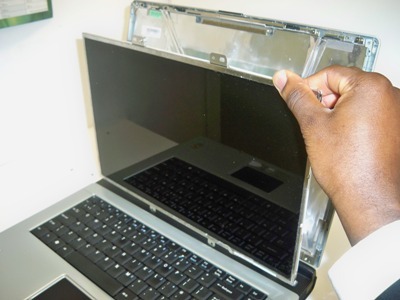
If your image problem is due to a broken or malfunctioning laptop screen replacing it is fairly easy. It should be noted that laptop screens are extremely expensive and can sometimes cost 50% or more of the total price of the computer, for instance more than $500 for a $1,000 computer. While you can purchase a new screen from your computer manufacturer, most people either decide to purchase a used laptop screen or buy a new computer. For those that decide to replace their computer screen, the only tool you will need is a screwdriver; here are some easy steps to follow.
- Step 1. First off note which type of screen your laptop has and purchase one that is guaranteed to fit. While some model laptops from the same manufacture may fit, ensure it fits before your go out and purchase it. Once you are ready to replace the screen, shut down the computer, remove the
battery and unplug it. - Step 2. Locate the screw covers on the plastic frame (usually rubber or plastic) to gain access to the screws that hold the screen to the bezel in pace. In most cases, your screen will have from 4 to 6 total screw covers. You will probably need a small flat head or Phillips screw driver; however some laptops might have their own screw heads which will require special screw drivers or Allen wrenches to remove the screws. Screw covers will usually be located on the bottom of the plastic frame, however every computer model is different, so you will have to search for the screw covers to gain access to the screen.
- Step 3. Once you have removed the screw covers, remove all the screws, holding the screen in place. Once all the screws are removed, gently pull away the screen from the plastic bezel. Usually the best way to accomplish this is to use your fingers to gently roll around the entire bezel loosening the screen. Once you rolled your fingers all around the bezel slightly separating the screen, pull the screen away from the bezel using a light to moderate amount of force. If the screen is still not budging, check to make sure if there are any other screws still attached.
- Step 4. Now that the bezel has been removed, you should see the screen surrounded by its metal frame. At this point, you can tilt the screen forward, exposing the metal back of the LCD frame. The screen should gently pop out of its back shell. You should be able to see the wires running from the screen to the laptop. There should be two main wires; the first is a ribbon which is the video cable. The video cable is usually taped in place. Remove the tape and then gently disconnect the ribbon from the LCD screen. The other wire is the power cable for the inverter. In most cases, if you are just replacing the LCD screen, you will continue to use the inverter, leaving it as is. However, if you are replacing the inverter as well, disconnect the power cable and unscrew the inverter from its mount.
- Step 5. Once your old screen has been removed, plug in the new screen and set it in the shell. However, before you screw in the bezels, you should test the screen to make sure it is working properly. In order to test the screen, you will need to power up your computer. If when you power up your computer, the screen is working properly, you can shut down the computer and continue to screw in the screen to the bezel and cover the screws with the plastic or rubber caps.
The replacement of your screen is complete. Your computer should work like new. Replacing your laptop screen on your own is a great way to save lots of money not only on the cost of the laptop screen, but the cost of labor as well
by tech-faq.com
by tech-faq.com
No comments:
Post a Comment