Tuesday, 22 March 2011

How to Repair a Laptop Screen

For those that own a laptop, one of the most common problems users experience hardware-wise is a broken or malfunctioning laptop screen. Laptop screens are essential to anyone using their laptop computer.Laptop screens can be incredibly delicate pieces of hardware,however, they are surprisingly very easy to fix- even if you are not a technical person.

Replace Your Laptop Screen

Broken notebook display? Popping in a new one is easier than you might think.What's more distressing than the sound of your laptop's screen cracking as it hits the floor? The voice of a tech-support rep telling you it will cost close to $1,000 to replace it. With little more than a screwdriver, however, you can replace the screen yourself and save a bundle. Read on to see if a new LCD will fix your ailing laptop, and if so, how to find and install a new screen.

Monday, 14 March 2011

Laptop Computer Repair Tips

Guys, don’t undertake laptop computer repair without reading this first. I’ll guide you away from making costly mistakes that could render your laptop computer useless.

First of all have a good understanding of what it is you need to do and what you might need in the way of tools. A big mistake people make is to sit down with a part and their laptop and use whatever they have around to open up the laptop and replace the part.

Laptop Keyboard Repair

Laptop keyboard repair is one of the more common jobs performed on laptops, it's also one of the easier repairs to carry out providing the following hasn't happened.

A spill of anything but water on a keyboard will 9 times out of 10 leave you in a situation that involves replacing the keyboard all together.

Keyboards are manufactured in such a way that leaves little to no room to clean out messy spills.


Basically any liquid containing sugar (soft drinks, beer, wine, coffee or tea) are bad news...

Tuesday, 8 March 2011

Accessing notebook hard drive using USB enclosure

If for some reason your notebook fails to boot and you need to access data on the hard drive (I assume there is nothing wrong with the hard drive itself), you can use an external USB enclosure. This method is very simple and could be very useful when you need an emergency access to your data on the hard drive.
First of all you’ll have to buy an external USB enclosure for notebook hard drives. These enclosures are inexpensive and usually you can buy them in any local computer store. You also can find a wide variety of external enclosures on the Internet. Make sure to buy a correct one, enclosures for ATA and SATA hard drives are different (the connector inside the case will be different). Usually the enclosure includes the case and the USB cables.

How to recover files from computer with crashed operating system

In this guide I explain how to recover files from a laptop (or desktop PC) with crashed, failed, damaged operating system.
WHEN CAN YOU USE THIS RECOVERY GUIDE?
1. The guide will work if your operating system damaged but the laptop (or desktop PC) hardware still works fine.
2. The guide might work if the hard drive has some minor damage, like a few bad sectors.
PREPARING FOR RECOVERY
For this recovery I’ll be using a Ubuntu CD (Linux OS). Also, you can create a bootable Ubuntu USB stick and use that instead of the CD. Don’t worry, you don’t have to be a Linux guru for that. The interface will be very similar to Windows OS.
You’ll need another working computer to download and create a bootable Ubundu CD or USB stick.
1. Download the latest version of Ubuntu OS here. When you click on the download button you’ll start downloading an ISO image.
2. Burn this ISO image on a CD or create a bootable USB stick. It’s explained on the same Ubuntu download page, just scroll a little bit down.
3. Find the target drive where you going to save recovered files. You can use an external USB hard drive or USB memory stick. The target drive can be formatted with any common Windows file system: FAT, FAT32, NTFS.

DATA RECOVERY PROCESS
STEP 1.
Boot your laptop from the Ubuntu CD or USB stick. Simply insert the CD or USB stick and restart the computer.
If the laptop (of desktop PC) keeps trying to boot from the internal hard drive, you’ll have to enter the BIOS setup menu and change the boot order. Set your CD/DVD drive or USB stick as first device in the boot order. Safe changes and restart the computer.
From my experience, Ubuntu OS works fine with most laptop and desktop PC hardware and you shouldn’t have any problem booting it to the desktop. It may not work if your computer hardware is too new.
STEP 2.
The computer will start booting from the CD or USB stick.
Now read carefully!
After some time a welcome screen will pop up. On this screen you can choose your language and choose between two options: Try Ubuntu and Install Ubuntu.
Select Try Ubuntu. In this case Linux OS will run directly from the CD or USB stick without changing any files on the hard drive.
STEP 3.
Ubuntu OS will continue loading and after a while you’ll boot to the desktop, as it shown on the following picture.

STEP 4.
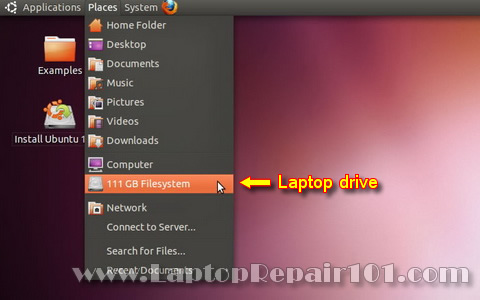
In order to access the internal hard drive, you click on Places in the top toolbar. You should see your internal hard drive in the drop down menu under the Computer.

STEP 5.
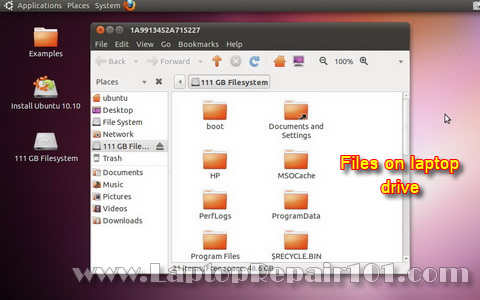
When you click on the internal hard drive a new window will open up. In this window you’ll see all files located on the hard drive.
Files on hard drive
STEP 6.
Now plug in your target drive: external USB hard drive or USB flash drive.
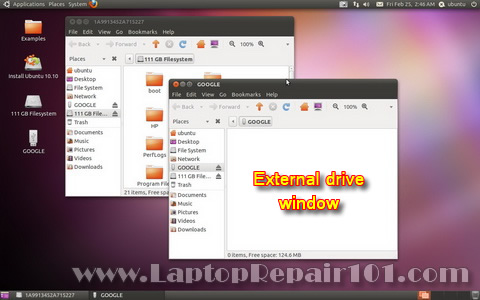
Another window will pop up. In this window you’ll see files located on the external drive. In my case I have no files on the external drive, that’s why the window is empty.
You can move windows same way you do it in Windows OS. Arrange both windows as you like.

STEP 7.
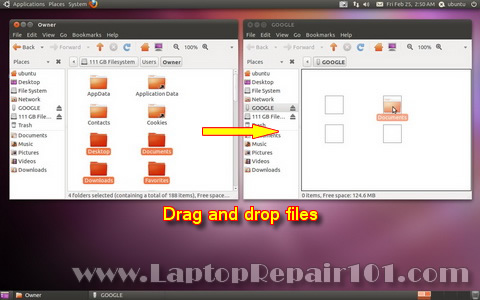
Finally, drag and drop needed files from the internal hard drive to the external drive.
After the transfer is done, you can unplug the external drive and use it on any other computer.

IF YOU HAVE FAILED HARDWARE
In case if your laptop (or desktop PC) has faulty hardware, you should try recovery with external USB enclosure.

                                                                                        by laptoprepair101

Friday, 25 February 2011

How to disassemble HP Pavilion tx2000 Tablet PC


In this guide I explain how to disassemble a HP Pavilion tx2000 Tablet PC and remove the motherboard. I’m removing the motherboard in order to repair failed NVIDIA chip.
Before you start, make sure the laptop is turned off and battery removed.
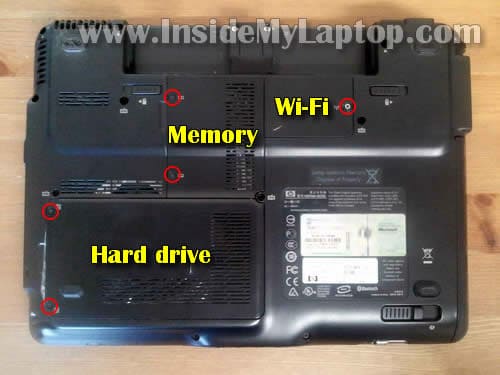
STEP 1.
Loosen five screws securing hard drive, memory and wireless card covers.
Remove all three covers.
STEP 2.
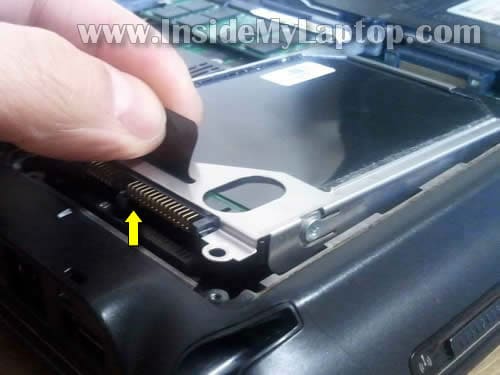
Lift up one side of the hard drive by the black tab to disconnect it from the motherboard.
STEP 3.
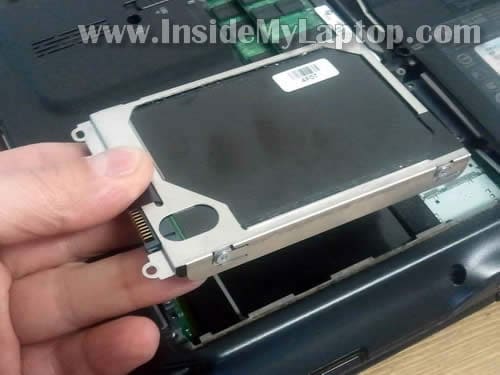
Remove the hard drive assembly.
By the way, it’s a regular 2.5″ notebook SATA hard drive. There is an adapter connected to the hard drive. That’s why the hard drive connector doesn’t look like a regular SATA connector.
STEP 4.
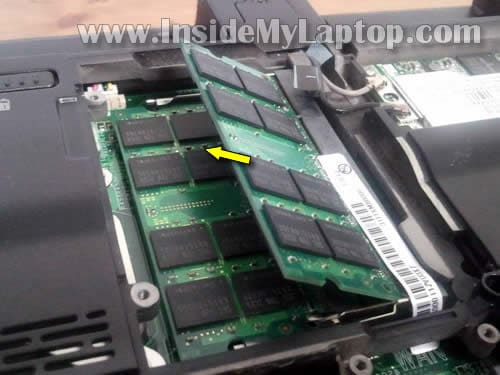
Both memory modules can be accessed though a door on the bottom of the laptop.
Remove both memory modules.
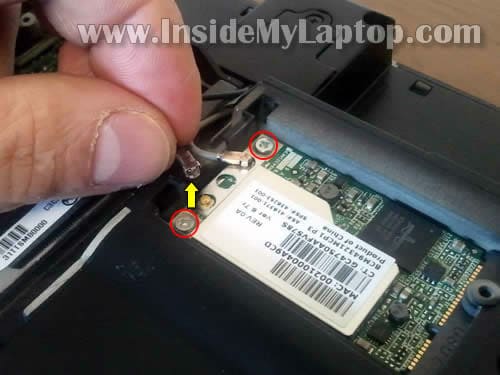
STEP 5.
Disconnect two antenna cables from the wireless card.
Remove two screws securing the wireless card.
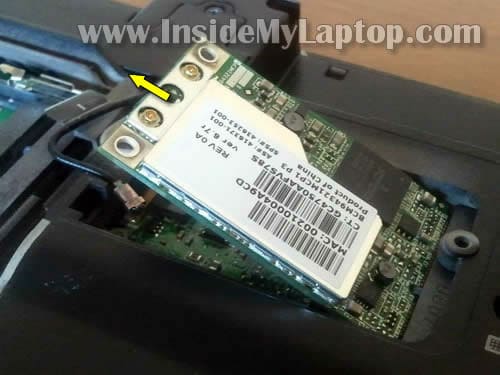
STEP 6.
Pull the wireless card from the slot.
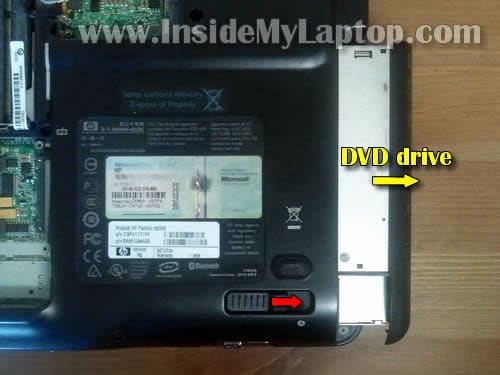
STEP 7.
Unlock the DVD drive and remove it from the laptop.
STEP 8.
Remove four screws securing laptop keyboard on the bottom.
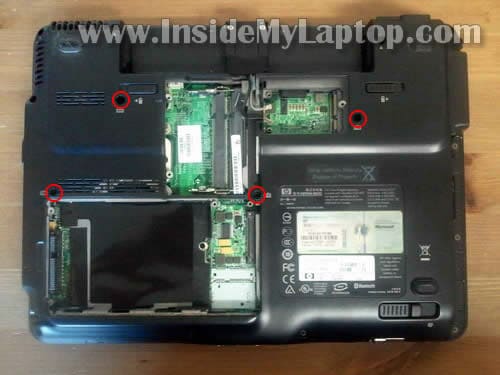
STEP 9.
Carefully lift up the keyboard from the laptop case.
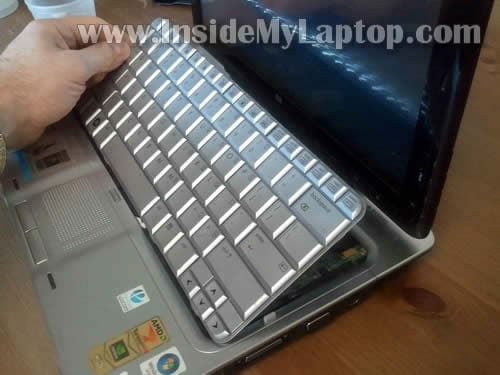
STEP 10.
Now you can access the keyboard cable connector which is located underneath the keyboard.
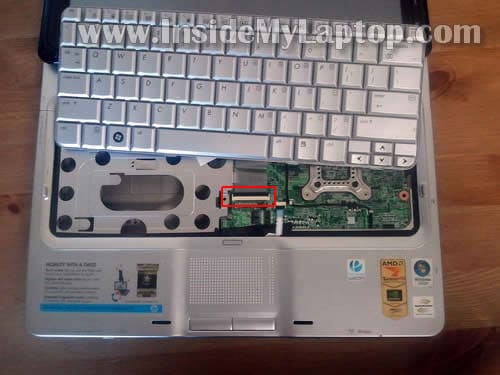
STEP 11.
Before you can remove the keyboard cable, you’ll have to unlock the connector.
On the following picture the connector shown in the locked position.
In order to unlock the connector, lift up the right side of the brown clip at a 90 degree angle.

STEP 12.
On the following picture the connector is shown in the unlocked position.
Now you can pull the keyboard cable from the connector.
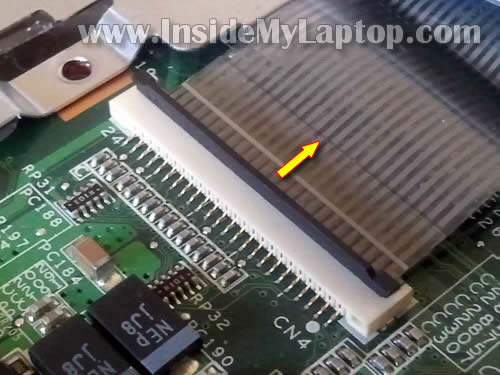
STEP 13.
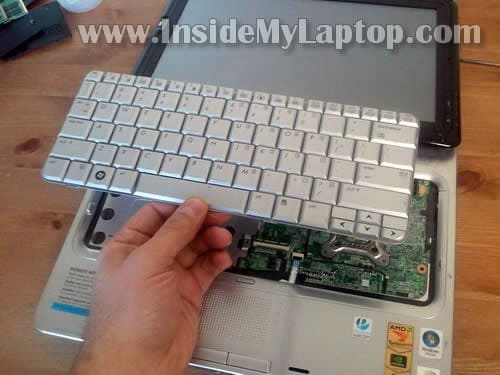
Remove the keyboard.
New replacement keyboard for HP Pavilion tx2000 laptops available here.
STEP 14.
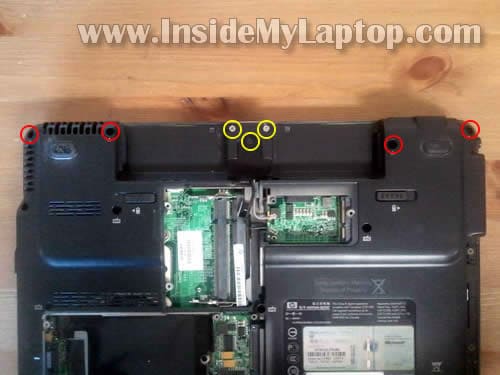
Remove four (red) screws securing the hinge cover.
Remove three (yellow) screws securing the display hinge and cable cover.
STEP 15.
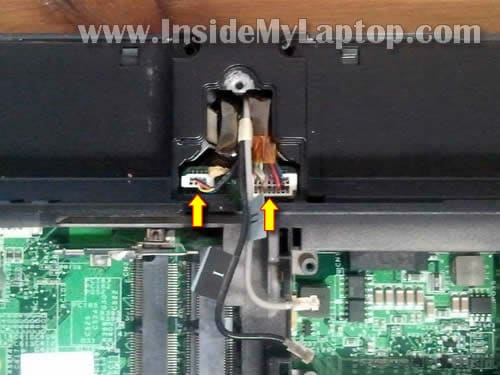
Under the cover you’ll find two display cables.
Disconnect both cables from the motherboard.
STEP 16.
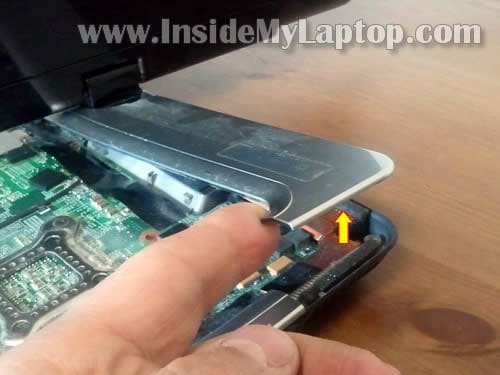
Turn the laptop display and start removing the hinge cover.
STEP 17.
The hinge cover removed.

STEP 18.
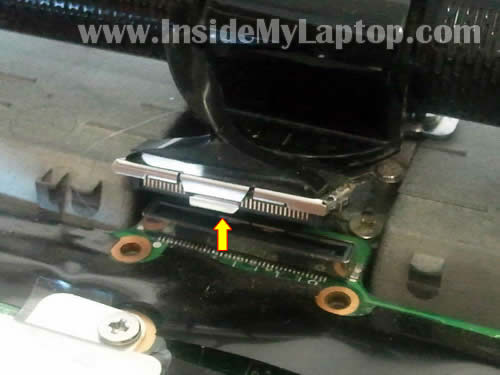
Disconnect LCD cable from the motherboard.
STEP 19.
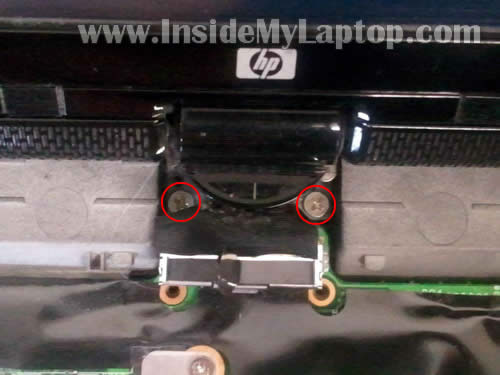
Remove two screws securing the display hinge.
STEP 20.
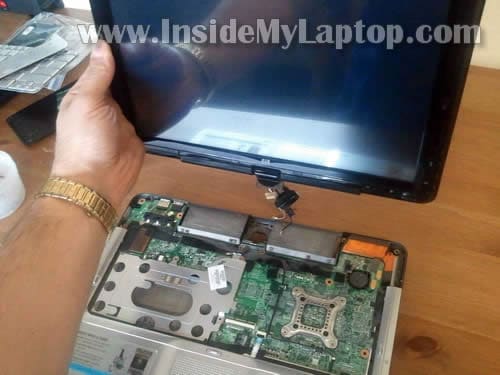
Lift up and remove the display assembly.
STEP 22.
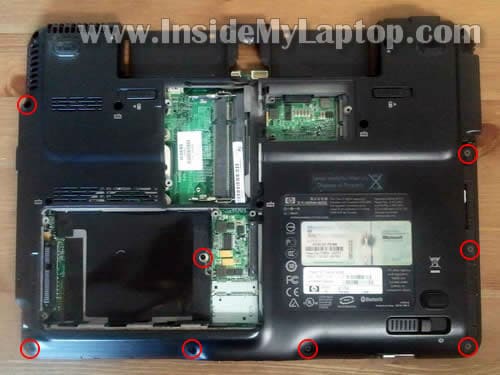
Remove screws from the bottom of the laptop.
STEP 23.
Remove two screws securing the top cover.
Disconnect two cables from the motherboard.
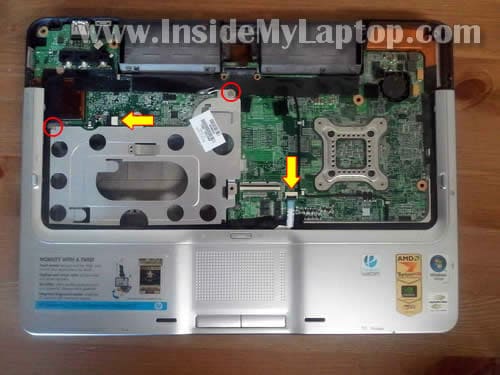
STEP 24.
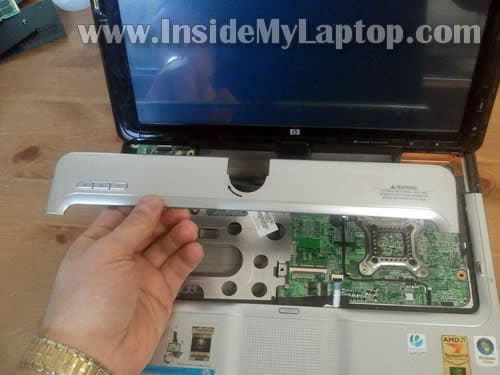
Remove the top cover assembly.
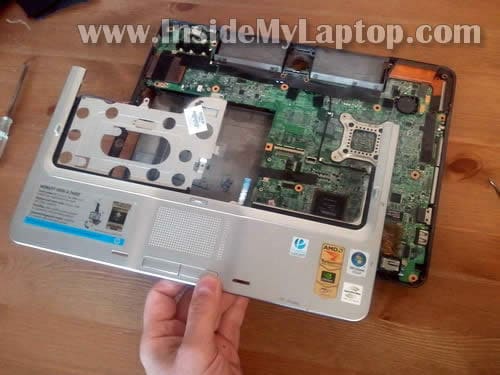
STEP 25.
Disconnect two cables from the motherboard.
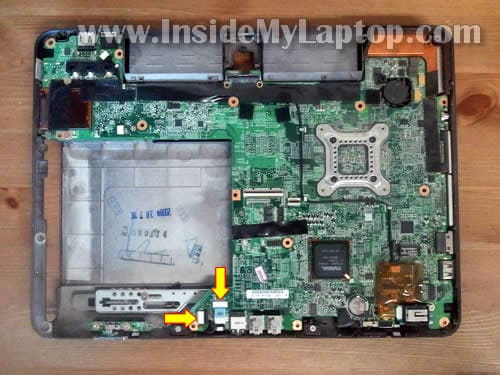
STEP 26.
Make sure the Express Card slot cover removed.
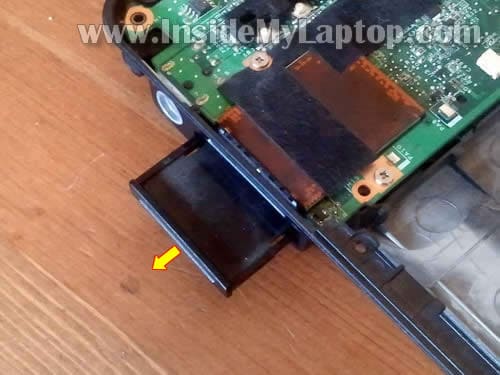
STEP 27.
Carefully lift up the left side of the motherboard.
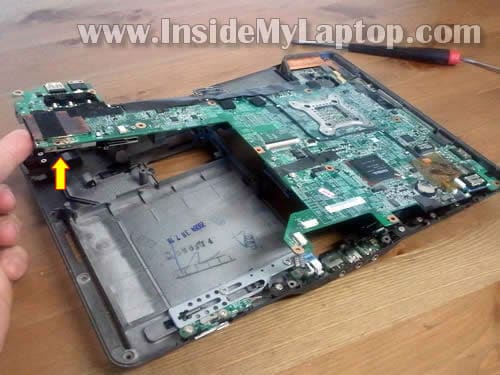
STEP 28.
Remove motherboard from the laptop base.
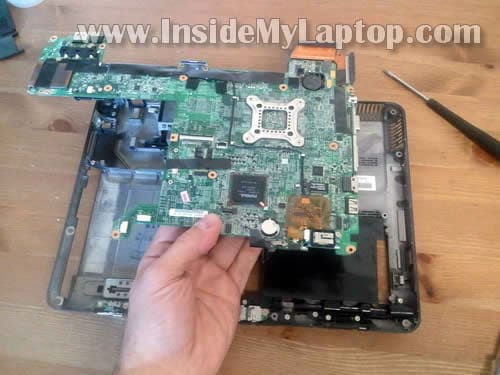
STEP 29.
The motherboard has been removed.
On this side of the motherboard you can access the CMOS battery.
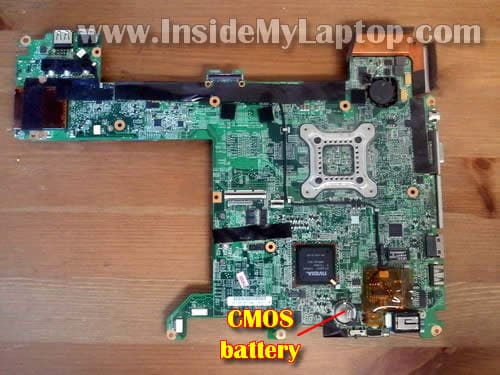
STEP 30.
On the other side of the motherboard you can access and remove the cooling module (heatsink with fan).
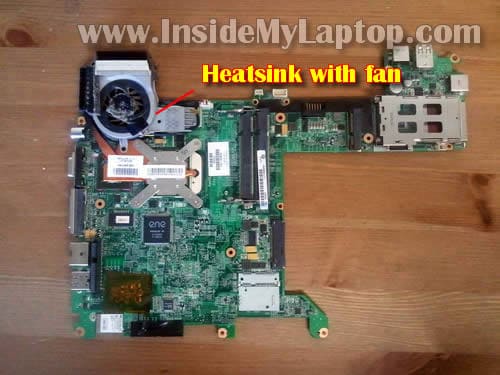
STEP 31.
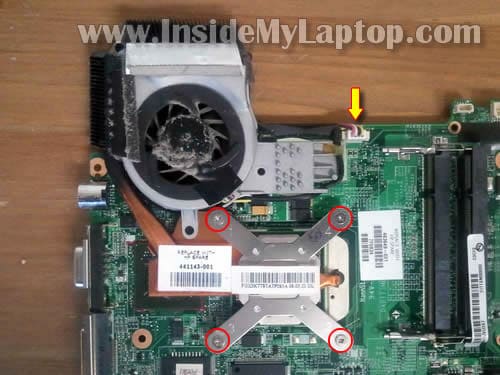
Remove four screws securing the heatsink assembly.
Disconnect fan cable from the motherboard.
STEP 32.
Carefully lift up and remove the cooling module.
New fans for HP Pavilion tx2000 laptops available here.
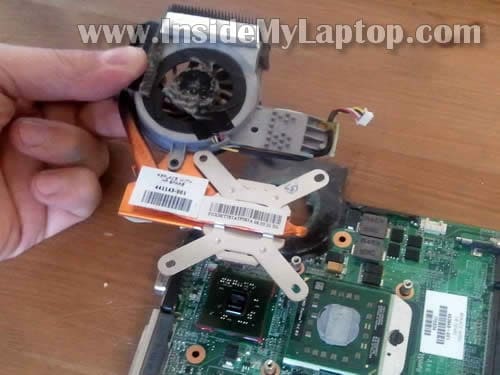
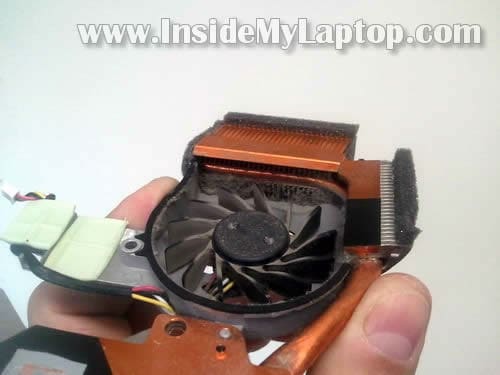
If the heatsink is clogged with dust, you can blow it off using compressed air.
STEP 33.
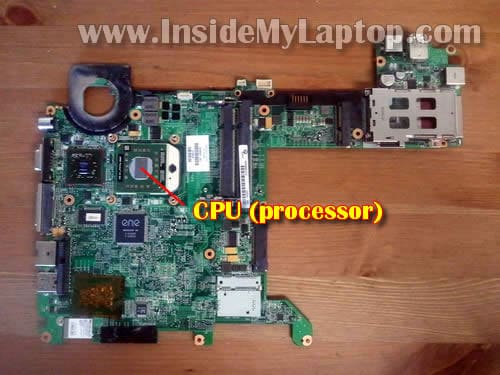
After the cooling module is removed, you can access and remove the CPU (processor).

                                                                                     by insidemylaptop